segunda-feira, 22 de junho de 2015

Como Instalar/Atualizar o Kernel 4.1.0 no Ubuntu / Linux Mint


How To: Install/Upgrade to Linux Kernel 4.1.0 in Ubuntu/Linux Mint Systems

    The Linux Kernel 4.1.0 is now available for the users, announced Linus Torvalds. This Linux Kernel version comes with plenty of fixes and improvements. This article will guide you to install or upgrade to Linux Kernel 4.1.0 in your Ubuntu or Linux Mint system.


Installation

For 32-Bit Systems

Download the .deb packages.

$ wget http://kernel.ubuntu.com/~kernel-ppa/mainline/v4.1-unstable/linux-headers-4.1.0-040100_4.1.0-040100.201506220235_all.deb

$ wget http://kernel.ubuntu.com/~kernel-ppa/mainline/v4.1-unstable/linux-headers-4.1.0-040100-generic_4.1.0-040100.201506220235_i386.deb

$ wget http://kernel.ubuntu.com/~kernel-ppa/mainline/v4.1-unstable/linux-image-4.1.0-040100-generic_4.1.0-040100.201506220235_i386.deb
Install them.

$ sudo dpkg -i linux-headers-4.1.0*.deb linux-image-4.1.0*.deb

After installing the kernel, you may run sudo update-grub command in terminal (Ctrl+Alt+T) to refresh grub boot-loader.

Reboot the system.

sudo reboot

For 64-Bit Systems

Download the .deb packages.

$ wget http://kernel.ubuntu.com/~kernel-ppa/mainline/v4.1-unstable/linux-headers-4.1.0-040100_4.1.0-040100.201506220235_all.deb

$ wget http://kernel.ubuntu.com/~kernel-ppa/mainline/v4.1-unstable/linux-headers-4.1.0-040100-generic_4.1.0-040100.201506220235_amd64.deb

$ wget http://kernel.ubuntu.com/~kernel-ppa/mainline/v4.1-unstable/linux-image-4.1.0-040100-generic_4.1.0-040100.201506220235_amd64.deb
Install them.

$ sudo dpkg -i linux-headers-4.1.0*.deb linux-image-4.1.0*.deb

After installing the kernel, you may run sudo update-grub command in terminal (Ctrl+Alt+T) to refresh grub boot-loader.
Reboot the system.

sudo reboot

To uninstall,

sudo apt-get remove 'linux-headers-4.1.0*' 'linux-image-4.1.0*'
Como Instalar/Atualizar o Kernel 4.0.5 no Ubuntu / Linux Mint


How To: Install/Upgrade to Linux Kernel 4.0.5 in Ubuntu/Linux Mint Systems


The Linux Kernel 4.0.5 is now available for the users, announced Linus Torvalds. This Linux Kernel version comes with plenty of fixes and improvements. This article will guide you to install or upgrade to Linux Kernel 4.0.5 in your Ubuntu or Linux Mint system.


Installation

For 32-Bit Systems

Download the .deb packages.

$ wget http://kernel.ubuntu.com/~kernel-ppa/mainline/v4.0.5-wily/linux-headers-4.0.5-040005_4.0.5-040005.201506061639_all.deb

$ wget http://kernel.ubuntu.com/~kernel-ppa/mainline/v4.0.5-wily/linux-headers-4.0.5-040005-generic_4.0.5-040005.201506061639_i386.deb

$ wget http://kernel.ubuntu.com/~kernel-ppa/mainline/v4.0.5-wily/linux-image-4.0.5-040005-generic_4.0.5-040005.201506061639_i386.deb
Install them.

$ sudo dpkg -i linux-headers-4.0.5*.deb linux-image-4.0.5*.deb

$ After installing the kernel, you may run sudo update-grub command in terminal (Ctrl+Alt+T) to refresh grub boot-loader.

Reboot the system.

sudo reboot


For 64-Bit Systems

Download the .deb packages.

$ wget http://kernel.ubuntu.com/~kernel-ppa/mainline/v4.0.5-wily/linux-headers-4.0.5-040005_4.0.5-040005.201506061639_all.deb

$ wget http://kernel.ubuntu.com/~kernel-ppa/mainline/v4.0.5-wily/linux-headers-4.0.5-040005-generic_4.0.5-040005.201506061639_amd64.deb

$ wget http://kernel.ubuntu.com/~kernel-ppa/mainline/v4.0.5-wily/linux-image-4.0.5-040005-generic_4.0.5-040005.201506061639_amd64.deb
Install them.

$ sudo dpkg -i linux-headers-4.0.5*.deb linux-image-4.0.5*.deb
Reboot the system.

After installing the kernel, you may run sudo update-grub command in terminal (Ctrl+Alt+T) to refresh grub boot-loader.
sudo reboot

To uninstall,

sudo apt-get remove 'linux-headers-4.0.5*' 'linux-image-4.0.5*'

terça-feira, 16 de junho de 2015

Zoneminder Debian Wheezy


Zoneminder Installation on Debian Wheezy


Turning a £7 worth webcam into a simple home surveilance system.

Install Zoneminder

We’ll be using a 32bit Debian Wheezy VM:
$ uname -rv
3.2.0-4-686-pae #1 SMP Debian 3.2.51-1
Update the system and install Zoneminder:
# apt-get update && apt-get upgrade -uV
# apt-get install zoneminder
Install Apache web server:
# apt-get install apache2

Add Apache User to the Video Group

This is needed for the webserver to be able to access the webcam:
# ls -l /dev/video0
crw-rw---T 1 root video 81, 0 Dec 19 20:36 /dev/video0
Add user to supplementary group:
# usermod -aG video www-data

Link Apache to Zoneminder

Open:
# vim /etc/zm/apache.conf
Check the file to look as below:
Alias /zm /usr/share/zoneminder
ScriptAlias /cgi-bin /usr/share/zoneminder/cgi-bin

<Directory /usr/share/zoneminder>
   php_flag register_globals off
   Options FollowSymLinks
   <IfModule mod_dir.c>
       DirectoryIndex index.php
   </IfModule>
</Directory>
Link Apache file:
# ln -s /etc/zm/apache.conf /etc/apache2/conf.d/zoneminder.conf

Optional: Install Cambozola Java Plugin

Cambozola is a Java plugin that decodes multipart JPEG streams.
Mozilla-based browser have native support.
This plugin is for browsers like Internet Explorer that lack that support.
# cd /usr/src
# wget http://www.andywilcock.com/code/cambozola/cambozola-latest.tar.gz
# tar xzvf cambozola-latest.tar.gz
# cp ./cambozola-0.935/dist/cambozola.jar /usr/share/zoneminder

Find Out Logitech QuickCam Pro 5000 Capabilities

Find the device number:
# lsusb
Bus 001 Device 001: ID 1d6b:0002 Linux Foundation 2.0 root hub
Bus 002 Device 001: ID 1d6b:0001 Linux Foundation 1.1 root hub
Bus 003 Device 001: ID 1d6b:0001 Linux Foundation 1.1 root hub
Bus 004 Device 001: ID 1d6b:0001 Linux Foundation 1.1 root hub
Bus 005 Device 001: ID 1d6b:0001 Linux Foundation 1.1 root hub
Bus 001 Device 004: ID 046d:08c5 Logitech, Inc. QuickCam Pro 5000
Get vendor and product codes (may also be seen from the output above):
# lsusb -s 004 -v | grep id
  idVendor           0x046d Logitech, Inc.
  idProduct          0x08c5 QuickCam Pro 5000
Get formats and resolution supported:
# zmu -d /dev/video0 -vqV2 
Video Device: /dev/video0
General Capabilities
  Driver: uvcvideo
  Card: UVC Camera (046d:08c5)
  Bus: usb-0000:00:1d.7-3
  Version: 3.2.51
  Type: 0x4000001
    Supports video capture (X)
    Does not support video output
    Does not support frame buffer overlay
    Does not support VBI capture
    Does not support VBI output
    Does not support sliced VBI capture
    Does not support sliced VBI output
    Does not support video output overlay
    Does not have tuner
    Does not have audio in and/or out
    Does not have radio
    Does not support read/write i/o (X)
    Does not support async i/o
    Supports streaming i/o (X)
    Standards:
  Formats:
    MJPEG (MJPG)
    YUV 4:2:2 (YUYV) (YUYV)
Crop Capabilities
  Bounds: 640 x 480
  Default: 640 x 480
Inputs: 1
  Input 0
    Name: Camera 1
    Type: Camera
    Audioset: 00000000
    Standards: 0x0
    Power on  (X)
    Signal detected  (X)
    Colour Signal detected
    Horizontal Lock detected

Set Shared Memory Configuration

We’ve only got 1 GB or RAM installed on our machine:
# cat /proc/meminfo | grep -i memtotal
MemTotal: 1022744 kB
Therefore we’ll set the SHMMAX to not exceed a half or our physical memory, 512MB. SHMMAX is the maximum size of a single shared memory segment set in bytes. To change the value on a running system:
# echo 536870912 > /proc/sys/kernel/shmmax
To make a change permanent:
# echo "kernel.shmmax = 536870912" >> /etc/sysctl.conf
SHMALL is not causing any problems, therefore won’t be changed:
# cat /proc/sys/kernel/shmall
2097152
Restart Daemons
# service apache2 restart
# service zoneminder restart

Add WebCam to Zoneminder WebUI

Navigate a web browser to http://localhost/zm.
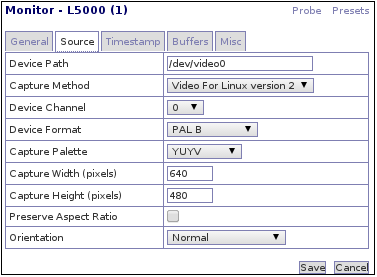
Click “Add New Monitor”. Settings for Logitech QuickCam Pro 5000 are shown below.
zm-logitech-qc-pro-5000

Optional

Under “System” tab, tick the box for “Authenticate user logins to ZoneMinder” to enable creation of user accounts with varying sets of permissions.
Under “Images” tab, check “Is the (optional) cambozola java streaming client installed” if chose to install earlier. Path to cambozola java streaming client should be “cambozola.jar”.
Under “Images” tab, add /usr/bin/ffmpeg to “Path to (optional) ffmpeg mpeg encoder (?)”.

Troubleshooting

# tail /var/log/messages
# tail /var/log/syslog
Also check Log section on Zoneminder WebUI.

Some Fixes

Dicas:
- Para passar o ZoneMinder quase todo para português (br):
   OPTIONS > SYSTEM > LANG_DEFAULT (passar para pt_br).

- O ZoneMider possui muitas configurações. Explore em “Opções”.
- Utilize uma partição separada ou outro disco para gravar os vídeos, para evitar problemas de superlotação na partição raiz. Siga a dica mais abaixo.

   - Quando se em várias câmeras compartilhadas em uma placa, pode-se enfrentar:
   - Imagem de uma câmera aparecendo em outra
   - Câmera sem imagem
   - Imagens misturadas

As soluções para estes problemas variam. Você pode tentar cada uma das opções abaixo. lembre-se de reiniciar o zoneminder após cada mudança.
Desmarque V4L_MULTI_BUFFER (em Opções >> config)
Mude CAPTURES_PER_FRAME para um valor como 2 ou 4 (Opções >> config)
Use Video For Linux version 1 para cada câmera (found in Origem >> Origem >> Capture Method)

I’ve noticed that syslog is being spammed with the following:
ERR [Shared data size conflict in shared_data for monitor L5000, expected 328, got 316]
Easy fix is available here. Open /usr/share/perl5/ZoneMinder/Memory.pm and change the following:
#our $arch = int(3.2*length(~0));
our $arch = 32;
Another one:
ERR [Can't make events/1: Permission denied]
And the fix:
# chown -R www-data:www-data /var/cache/zoneminder/events
# chown -R www-data:www-data /var/cache/zoneminder/images

Autor: Tomas
Link: https://www.lisenet.com/2013/zoneminder-installation-on-debian-wheezy-with-logitech-quickcam-pro-5000/

Instalação GV-250/GV-600/V-800 ubuntu


Instalando a placa de captura

CFTV Geovision GV-250 (bttv878a) para 16 câmeras em um servidor GNU\Linux com Ubuntu  e ZoneMinder.,
InstalandoApos a instalação do Ubuntu com a placa no slot pci eu verifiquei que a mesma tinha sido detectada mas não corretamente.
SO tinha tentado até subir um modulo mas nada.
#dmesg | grep bttv

Procurei um pouco no google e aqui achei no wiki do ubuntu como fazer para subir o modulo corretamente.
Para instalar a versão mais nova do v4l-dvb use os seguintes comandos
ESSES PROCEDIMENTOS DE ATUALIZAÇÃO E SO PARA 
O UBUNTU 8.04 O RESTO DAS VERSÕES NÃO É 
NECESSÁRIO 
#sudo apt-get install dvb-utils mercurial build-essential linux-headers-$(uname -r)
#hg clone http://linuxtv.org/hg/~hverkuil/v4l-dvb/
#cd v4l-dvb
#hg update -C 4501 Para quem estivese tendo erro
#make
#sudo make install
Reinicie e apos isto execute
#modprobe -r bttv
#modprobe bttv card=150

Depois de instalado tudo certinho tem que da permissões na pasta chmod 666/dev/video0  executar esse comando para aumentar a memória
nano /etc/sysctl.conf
kernel.shmall = 134217728
kernel.shmmax = 134217728

Se vc tiver algum programa de Tv instalado como o TVtime, basta plugar a camera e iniciar o programa que vai funcionar. Resolvendo problemas:


Quando não conseguimos instalar a captura, aceitamos toda a ajuda possível e é comum os termos:
inclua no arquivo
crie o arquivo com
e isso pode comprometer a instalação de acordo com o que tenha sido feito somente
uma referencia ao modulo é suficiente para inicializa-lo corretamente digite num terminal:
grep -Rs bttv /etc/modprobe.d/
grep -Rs bttv /etc/rc?.d/  -- no Debian
grep -Rs bttv  /etc/rc.d/rc?.d/  -- no Mandriva, Fedora
grep -Rs bttv  /etc/init.d/*.d/  -- no OpenSuse
grep bttv /etc/modules
isto vai mostrar qualquer arquivo que tenha referencias ao modulo bttv se o arquivo tiver
outras referencias além das referencias ao modulo bttv, apenas apague as linhas ou comente-as
se o arquivo não tiver mais nada além das referencias ao modulo bttv,
apague o arquivo no arquivo /etc/modules, existem os módulos que
serão inicializados no boot este passo elimina futuros problemas (‘não consigo instalar’)
Testando o subsystem:
A placa 'Geovision GV-600', tem o seguinte subsystem:
008a:763c
para conhecer o subsystem de sua placa digite no terminal:
$ dmesg | grep bttv | grep subsystem
se o subsystem de sua placa não estiver contido na lista acima,
é quase certo que sua placa não ira funcionar conselho – procure
pela card correta. Achar a captura pelo subsystem se quiser continuar, esteja a vontade.
Arquivo de opções para placa [Geovision GV-600]:
Vamos criar este primeiro arquivo que são as opções que
serão utilizadas quando inicializar o modulo bttv,
este é o principal arquivo de configurações da placa de captura
em raras exceções ele não será usado
digite o comando abaixo no terminal.
nano /etc/modprobe.d/captura
# bttv módulos
# quando inicializar o modulo bttv usa estas opções
# escrito por Mstr (GLP)
# adaptado por (seu nome)

# isto também pode ser usado para setar varias placas de captura
alias char-major-81 videodev
options i2c-algo-bit bit_test=1
alias char-major-81-0 bttv
alias char-major-81-1 off
alias char-major-81-2 off
alias char-major-81-3 off

# se precisar alterar os devs video ou radio para 1 descomente as devidas linhas
# alias /dev/video1 bttv
# alias /dev/radio1 bttv

options bttv card=150 tuner=-1  ;(GV-250 GV-600)

# options bttv card=72 tuner=-43 (Prolink Pixelview PV-BT878P+9B)
# ainda pode-se incluir na linha acima (só inclua se desejar alterar o valor default)
# radio=0/1, default é 0 (sem radio)
# pll=0/1/2, deixa o modulo decidir (cristal de recepção)
# autoload=0/1, default é 1 (sim)
# bttv_debug=0/1, default é 0 (não)
# gbuffers=2-32, default é 4
# gbufsize= , default e máximo valor é 0x208000 (2MB)
# automute=0/1, default é 1 (sim)
# outra informações podem ser obtidas em 'modinfo bttv'
INSTALAÇÃO ZONEMINDER + MOTION clique aqui!


OPÇÃO 2 para placa GV-800
 
  
nano  /etc/modprobe.d/captura
# i2c
alias char-major-89 i2c-dev
options i2c-core i2c_debug=1
options i2c-algo-bit bit_test=1
# bttv
alias char-major-81 videodev
alias char-major-81-0 bttv
options bttv card=157,158,158,158 tuner=4,4,4,4 radio=0
options tuner debug=1
  
EXEMPLOS ABAIXO:
O esquema da câmera é:
Camera 1 -> /dev/video0 channel 0
Camera 2 -> /dev/video1 channel 0
Camera 3 -> /dev/video2 channel 0
Camera 4 -> /dev/video3 channel 0
Camera 5 -> /dev/video0 channel 1
Camera 6 -> /dev/video1 channel 1
Camera 7 -> /dev/video2 channel 1
Camera 8 -> /dev/video3 channel 1
Camera 9 -> /dev/video0 channel 2
Camera 10 -> /dev/video1 channel 2
Camera 11 -> /dev/video2 channel 2
Camera 12 -> /dev/video3 channel 2
Camera 13 -> /dev/video0 channel 3
Camera 14 -> /dev/video1 channel 3
Camera 15 -> /dev/video2 channel 3
Camera 16 -> /dev/video3 channel 3